안녕하세요
오늘은 좀 어려운 것을 보여드릴께요
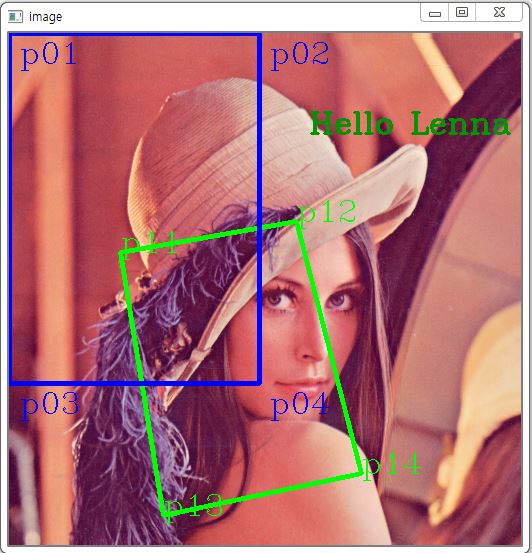
아래의 아름다운 Lenna 사진을 변행해 보겠습니다.

P11,P12,P13,P14부분을 잘라서 P01,P02,P03,P04로 변형해 보겠습니다.
P11 : 좌측/위쪽
P12 : 우측/위쪽
P13 : 좌측/아래
P14 : 우측/아래
* 순서가 중요합니다.
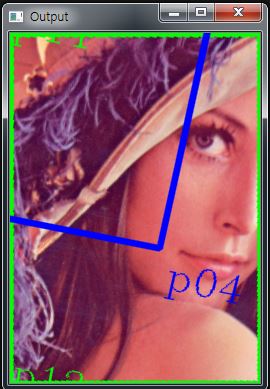
결과 화면입니다.(width,height = 250,350)
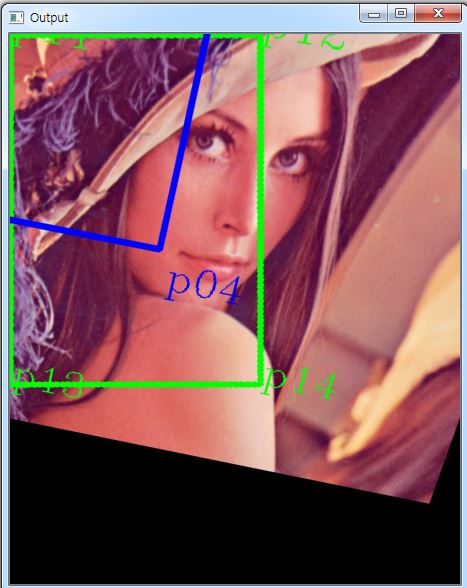
width와 heigth를 200씩 키워본 화면입니다.(width,height = 250+200,350+200)
아래는 전체 코드입니다.
Python의 CV2 라는 Computer Vision 모듈이 필요합니다.
import cv2 as cv
file = r'img\lenna.png'
img = cv.imread(file)
width,height = 250,350
p11 = (111,219)
p12 = (287,188)
p13 = (154,482)
p14 = (352,440)
cv.line(img,p11,p12,(0,255,0),3)
cv.line(img,p12,p14,(0,255,0),3)
cv.line(img,p14,p13,(0,255,0),3)
cv.line(img,p13,p11,(0,255,0),3)
cv.putText(img,"p11",p11,cv.FONT_HERSHEY_COMPLEX,1,(0,255,0),1)
cv.putText(img,"p12",p12,cv.FONT_HERSHEY_COMPLEX,1,(0,255,0),1)
cv.putText(img,"p13",p13,cv.FONT_HERSHEY_COMPLEX,1,(0,255,0),1)
cv.putText(img,"p14",p14,cv.FONT_HERSHEY_COMPLEX,1,(0,255,0),1)
p01 = list(p11)
p02 = list(p12)
p03 = list(p13)
p04 = list(p14)
pts1 =np.float32( [p01,p02,p03,p04] )
p01 = (0,0)
p02 = (width,0)
p03 = (0,height)
p04 = (width,height)
cv.line(img,p01,p02,(255,0,0),3)
cv.line(img,p02,p04,(255,0,0),3)
cv.line(img,p04,p03,(255,0,0),3)
cv.line(img,p03,p01,(255,0,0),3)
cv.putText(img,"p01",(10,30),cv.FONT_HERSHEY_COMPLEX,1,(255,0,0),1)
cv.putText(img,"p02",(width+10,30),cv.FONT_HERSHEY_COMPLEX,1,(255,0,0),1)
cv.putText(img,"p03",(10,height+30),cv.FONT_HERSHEY_COMPLEX,1,(255,0,0),1)
cv.putText(img,"p04",(width+10,height+30),cv.FONT_HERSHEY_COMPLEX,1,(255,0,0),1)
p001 = list(p01)
p002 = list(p02)
p003 = list(p03)
p004 = list(p04)
pts2 = np.float32([p001,p002,p003,p004])
matrix = cv.getPerspectiveTransform(pts1,pts2)
# print(matrix)
# print('\n')
cv.putText(img,"Hello Lenna",(300,100),cv.FONT_HERSHEY_COMPLEX,1,(0,150,0),2)
imgOut=cv.warpPerspective(img,matrix,(width+200,height+200))
cv.imshow("image",img)
cv.imshow("Output",imgOut)
cv.waitKey(0)
'Python > Python' 카테고리의 다른 글
| Python,처음배우기(10),그래프그리기,maplotlib.pyplot (0) | 2020.05.24 |
|---|---|
| Python,처음배우기(9) class예제 (0) | 2020.05.24 |
| Python,처음배우기(8) argv (0) | 2020.05.17 |
| Python, 처음배우기(2) Spyder 사용법 (0) | 2020.05.12 |
| Python, 처음 배우기(1), Python 필수설치 프로그램 (1) | 2020.05.12 |

